Category Archives: Uncategorized

Ubuntu Hardware Course Screencasting: Screenpainting + live webcam feed (12.10, wacom CTL-480, zoom h1, Ardesia, gtk-recordmydesktop, OpenShot, cheese, key-mon, Arduino)

Hello dear friends!
Today I’m here to talk about screencasting a hardware course in Ubuntu using tools that are free (no-cost) to use. I had some issues that were cinnamon-on-ubuntu specific, and others I’m still not sure the cause of, but overall I’m pretty pleased with how things turned out.

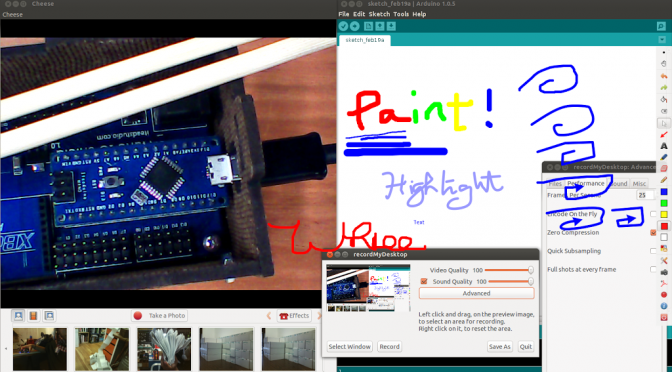
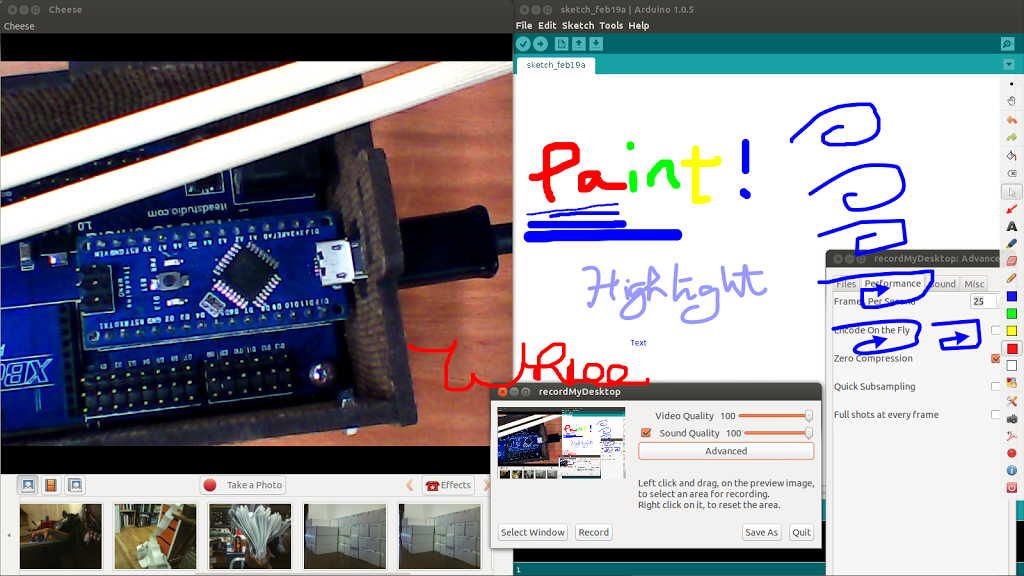
Left: Cheese; Right: Arduino, Ardesia; Bottom: gtk-recordmydesktop; Overlaid Writing/Drawing: Ardeisa
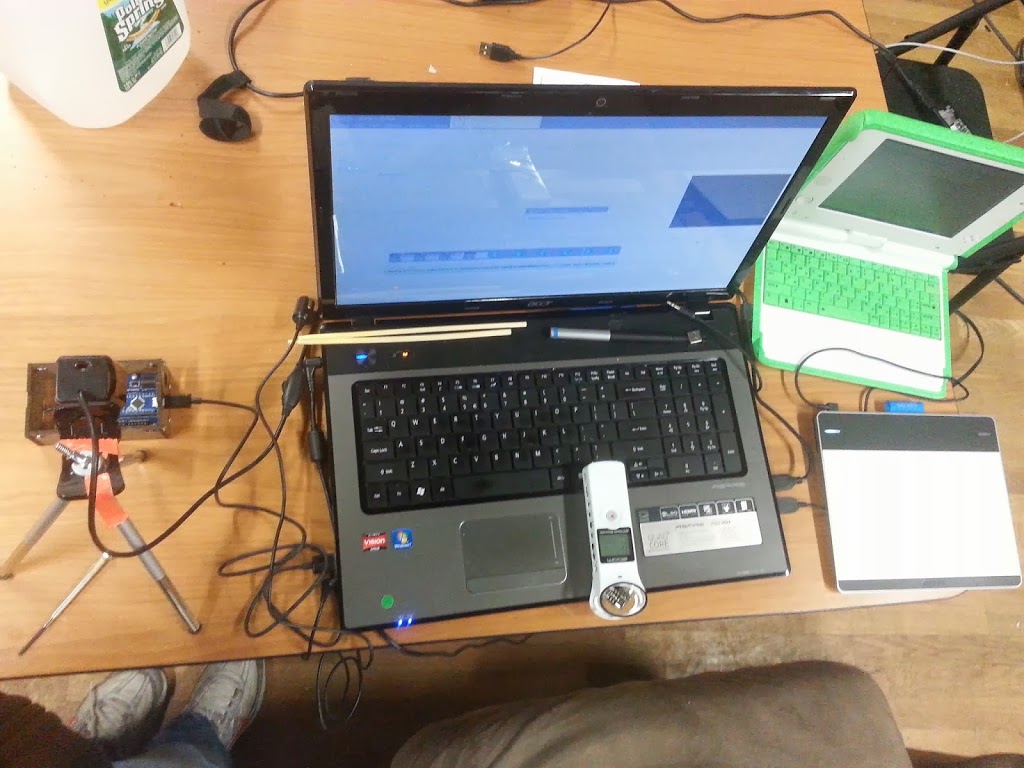
Hardware setup:

  1. USB webcam on a tiny tripod
  2. wacom tablet (CTL-480) — to get this tablet working in Ubuntu, see step 1, step 2
  3. Zoom H1 recorder with v2.0 firmware (for USB mic support in linux) — to see which firmware version you have, simply turn on the recorder and at the top it will say “2/00” if you have version 2 (shown without USB cable)
  4. and then I had the iteaduino (arduino clone) and 
  5. my laptop
  6. secondary laptop for displaying the script

Lower Screen Resolution

My default resolution is 1600×900. First step, Lower the screen resolution to 1280×720 to make text readable at lower dpi and file sizes smaller (and thereby make your lower-bandwidth internet users happier!)

1) Install gnome-session-fallback.
sudo apt-get install gnome-session-fallback
This is because I’m running cinnamon and can’t get the display to change resolutions unless I log in as gnome-classic instead. You need gnome classic WITH effects for Ardesia to work, by the way.

2) Open a terminal (alt-f2, gnome-terminal). Run gnome-control-center. Click on “Displays”. Lower the resolution to 1280×720, which is standard HD resolution (youtube uses 16:9).

Get Alt-Tab Working Again

Okay, now we’re running Ubuntu 12.10 with gnome classic fallback, and ugh Alt-Tab doesn’t work wtf. To get it working:

sudo apt-get install compizconfig-settings-manager
sudo apt-get install compiz-plugins
ccsm

Then go to Window Management > Application Switcher > Enable. Okay now I also have ultra-fancy alt-tab swoosh effects too, but at least I have alt-tab.

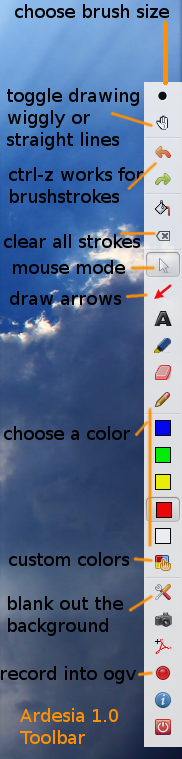
Drawing on the Screen:

sudo apt-get install ardesia

Ardesia is great! It’s very easy to use, is in the ubuntu repositories, and provides multiple options for drawing on the screen. See first picture at the very top (where I show how it can toggle between wiggly, smoothed wiggly, and squareish lines, as well as draw arrows), as well as this one:

However, when I try to screencast in Ardesia, the audio (whether I use the internal mic, or the zoom H1 as a USB mic) is unusably choppy.

Thus, we use yet-another-application for the actual screencasting!

For screencasting (recording the screen)

I used gtk-recordmydesktop.
sudo apt-get install recordmydesktop.

This had a bit of a learning curve for me. There is a tray icon that shows or hides the main window, and when you hit “Record” the main window goes away automatically. It doesn’t save the file as anything usable at first, when you stop recording it begins encoding and then saves as an OGV file in the directory where you selected in the “Save As” dialog in the main window. Also, since we have a stereo mic with the Zoom H1, I went to advanced settings (upped the frame rate to 25 fps as well) and increased it to 2 audio channels. I don’t know if this actually affected the output, but presumably it does.

Officially youtube doesn’t support ogv, but I haven’t had issues with uploading the OGV files this application created.

For a live view of the hardware

I used a webcam connected to Cheese and then resized cheese until the lower toolbar disappeared.
sudo apt-get install cheese

I had a laptop camera as well. To choose the external webcam instead I simply went to Cheese > Preferences > Device  and chose “USB2.0 Camera /dev/video0” instead of “1.3M HD Webcam /dev/video1”.
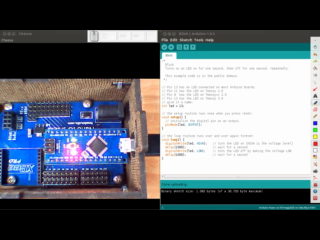
For USB Mic

For a comparison of the audio quality using my internal mic versus using the Zoom H1, see:

 
With laptop mic
 
 With Zoom H1 as USB mic

Connect the Zoom H1 to the computer. On the screen it will blink between “USB Card and USB Audio. Hit the red record button when it says “Audio”, then hit the red button again to accept the audio settings. Now go to
gnome-control-center > Sound (or “Sound Settings…” under the volume tray icon in the gnome panel). Under “Hardware” you should see “H4 Digital Recorder”.

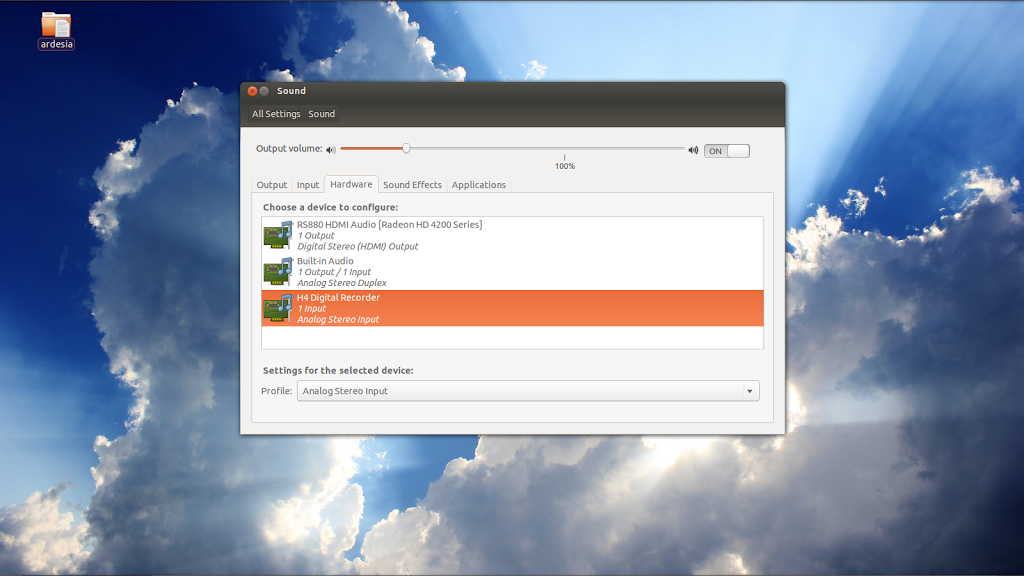
I set it to “Input” only (instead of duplex) to be safe. Then, under “Input”, you should see “H4 Digital Recorder Analog Stereo.” If you don’t see it in “Input”, but it shows up in “Hardware”, try rebooting your computer — that did the trick for me.

For displaying which keys are pressed

I used key-mon.
sudo apt-get install python-pip
sudo pip install key-mon

For syncing audio and video, or video editing

Say like me you initially didn’t figure on using yet another application to get non-choppy audio simultaneously recorded with the video screencast, and instead have a .wav file from your zoom recorder and a .ogv file from your screencasting tool. How do you sync up the audio and video files appropriately?

PiTiVi was sad for me. I liked pitivi, because it displays the audio waveform, which is useful. However, the video preview was really choppy (unusable for syncing purposes) even when I selected “video thumbnail 1/100 sec” and the export didn’t work.

Use OpenShot.
sudo apt-get install openshot

The export settings are pretty self-explanatory. For now, I’ve settled on using “Device> AppleTV” as the settings I use. “Web >Youtube-HD” probably also works. When I tried manually selecting “H264” and “AAC” audio like youtube recommends, though, OpenShot gave me a .h264 file that youtube grudgingly accepted and converted for me (but I couldn’t open in VLC or anything locally). So… just stick with the “simple” export settings and everything is great.

By the way, OpenShot 1.4.3 doesn’t like to import OGV files on my computer (pops up an error, “ogv not supported). Therefore:

Convert OGV to AVI or MP4

Use ffmpeg or avconv to convert the OGV file into AVI or mp4 and then import into OpenShot.
ffmpeg -sameq -i ardesia_project_2014-19-2_18:11:24.ogv output.avi
or
avconv -i ardesia_project_2014-19-2_18:11:24.ogv output.mp4

Then open the AVI file into OpenShot, along with the WAV audio file, drag-and-drop to sync the files, and then hit export.

Voila! 

You have a video 🙂
For an example of the output, see http://www.youtube.com/watch?v=8ZgO082rD2g. It’s a bit fuzzy, probably in part because I recorded it in 4:3 (1024×768) instead of 16:9 which it was converted to (1280×720). But the text is mostly legible.

Second Winter School Hike: Warm toes while skating and griliing on Lonesome Lake!

(for why I’ve suddenly become more interested in exerting physical effort despite my long-standing belief that I’m not interested in sports, exercise, or outdoors things, see previous post)

We hiked ~1.2 miles up ~1000 ft to Lonesome Lake carrying grills, charcoal, skates, group emergency gear (foam sleeping pads and tarp if we got stuck on the mountain), and food and drinks.
Or rather everyone else did except me, since I had a dinky little book bag that made everyone pass over me in letting me take group gear.

I’ve learned gradually that people hike for different reasons. Four years ago I did not understand the point whatsoever. I grew up flying and driving to cities and walking around cultural landmarks, not really nature. But now through talking to people I realize that some people do it to enjoy nature, some for the exercise, some for the community / social aspects, some for the challenge and summits, etc.

Each trip has taught me more about my physical fitness level and what equipment I need to be comfortable. ahhh I was so tired the next day (today), I slept for 15 hours and still feel tired (and now I feel sore all over). But the day of, the hike was pretty easy for me.

trip start! (actually our first stop was dunkin’ donuts, but w/e)
Grilling supplies and ice skates! Not pictured: the half gallon of milk and half gallon of cider we also brought up.
this was roughly the angle of elevation all the way up. steep but we managed without using microspikes at all since there were only a few by-passable patches of ice.
We all slipped and slid a decent amount, but for the most part the hike was pretty easy. Especially for me, since I was carrying almost nothing.
one of our trip leaders and another group member carrying the shovels for clearing the lake, the grill parts, and skates.
We reach the top around noon after two hours. We went really slowly.
frozen lonesome lake covered in snow!
we had a trap and put all our gear on it
then brought out the liquid (?) stoves which will work in the cold. they require priming to heat up the pipes before they will work.
hot cider on the lake with ice skating in the background!
shoveling to widen the ice skating rink path. you can see the grill to the left.
the Appalachian Trail crosses here!
and there’s an Appalachian Mountain Club “hut” complete with wood stove, solar panels, and a bathroom with composting toilets and even toilet paper
view from the hut was gorgeous
swag for sale inside the hut
grilling those kebabs wait what is that
shrimp and steak kebabs? talk about gourmet trail food 🙂
foooooddd chowing down
skating on the lake
walking on the short trail around the lake.
it was really pretty.
snow fight!
sledding down the hill.
I was introduced to butt-sledding as well. Since it was often steep enough and we had waterproof snow pants, we could sit on our butts and slide down the trail. It was a LOT more fun going down the trail than up the trail!
near the end of the trip. it started snowing toward the end and the pretty views from earlier were gone. missing two members: me and the trip leader who made all the kebabs

More pictures here.

Gear-wise, I didn’t need my big poofy jacket at all. I learned that if at the beginning of the hike up hill you are warm already, definitely delayer. I learned to wear gloves when sledding.

Holy hexapods, my extremities were sometimes the warmest parts of me! The uphill hike really helped, and I opened toe warmers but ended up using them to warm my fingers. The MITOC rental boots are amazingly warm compared to rain boots, which is what I wore last time. Below is a picture of 90% of the items I brought or wore on the hike.

cover your eyes if this is TMI. all non-cotton
Feet: liner socks, thick wool blend socks, sorel winter hiking boots
Hands: sometimes thin liner gloves (not pictured), sometimes thinsulate 40g gloves (not pictured), sometimes the black polyester ones pictured here although not really the last one
Lower body: non-cotton underwear, fleece leggings, base layer, I added snow pants (not pictured) for skating / standing around / downhill
Upper body: Base layer, patagonia alpine jacket I got for free with awesome zipper jackets, windbreaker
Head: cotton-filled knit hat thing, some polyester cloth I’m using to tie around my lower face when my nose and chin get cold
Essentials: Toilet paper, pads, fire starter, compass, headlamp, whistle, trail snacks, some bandages and gauze
Water: 2 liters of water. I used 1.25 liters from 10 am to 6pm.

I was pretty frickin’ happy the entire trip because my hands and feet were so happy.

Also, in terms of waterproof shell layer which I still don’t have, currently investigating making them from tyvek or other waterproof materials (e.g. kite material).

All-in-all a great trip. All the other hikers at the top marvelled at us deciding to bring an entire grill and charcoal and shovels and skates, reminding us that our trip was a little atypical.

Winter school has ended now, and time to plan some backpacking / 20 mile trips, in between fixing boats (future post, maybe in a few months).

AT week-long hike planning (PONIES!) || MIT Outdoors Club, Winter School: Easy Hike

Grayson Highlands State Park, aka PONIES

Out of the blue one day a few weeks ago, my friend Judy asked me if I wanted to backpack a week-long section of the Appalachian Trail with her in late May.

I didn’t grow up doing sports, exercise, or any sort of physical activity, let alone outdoors activities. Only with a more varied social circle in college (and in particular with more time and money post-undergrad) have I started to take more interest in outdoors activities or physical exercise at all.

Our current preferred choice is to hike SOBO (southbound) from Atkins to Damascus at a leisurely place, taking time to enjoy the PONIES. 😀

http://www.whiteblaze.net/forum/archive/index.php/t-39258.html

We hiked Southbound from Atkins to Damsacus (75 Miles) and it seemed to have some level and gradual climbing. We did it in 5 days but you could make it six days the Grayson Highlands are great.

One piece of advice is as you approach Grayson Highlands Park and the area around Mt. Rogers, I’d pack an extra day’s worth of food, as this is a place you’ll won’t want to hurry thru, and may well want to slow down, and maybe even take a full day off. “Zero” days on the Trail can be better than days off in town, but very few folks ever do this, partly because they haven’t brought along enough provisions.

I learned from experience that it’s far preferable to shuttle to your starting point and get back when you get back, than to hike to a prearranged shuttle at a set time and have to worry about making it on time for your whole hike.

We are worried about how we will get there and back. It would suck to rent a car for a week and just have it sit at the trailhead burning rental money. We’ll see. Hiking the AT in NY would be much easier, since we can reach the trail by public transit, but if we’re committing a week’s worth of time on the trail and far more preparing for the hike, we will probably prefer to hike a prettier section of the trail.


In any case, we are starting several months ahead of time because of our lack of experience with backpacking. Areas of preparation include food, gear, physical fitness, and backpacking experience.


My initial plan was to climb the porter square T stop stairs (before the pay entrance) every day, since it only takes around 45 minutes including walking there and back from my house (because I can only climb 15 minutes of stairs).

picture proof I sent to Judy, who lives in NY

The stairs are really narrow so it’s a good thing I’m the only one doing this. However, this plan fell through, as most of my plans tend to do, in part because I have been feeling crunched for time between NarwhalEdu‘s contract work and our kickstarter work. The new plan is to resume when we finish our MIT Office of Digital Learning contract work, probably in mid-February. It’s interesting. I never found much point in exercising even though it’s definitively good for you, but I find the idea of exercise a lot less tedious and more interesting when there’s a goal I am seriously interested in in mind (spending time on an adventure with a great friend).

In the meantime, on the weekends, to help convince myself to exercise, I have been participating in MIT Outdoors Club (MITOC) winter school (open MIT students, affiliates, alums, and the general community). “Participating,” since for various reasons this past weekend was my first winter hike to Noanet Woods in Dover, MA (about 40 minutes drive from MIT).

Note: In case they send out the email with links four hours after sign-ups open again next year and screw over newcomers on the first weekend trips, go to http://web.mit.edu/mitoc/www/#join_trip to sign up for a trip. Trips fill up fast so be sure to sign up exactly Wednesday at noon. Getting off the waitlist is possible if  you’re high up, so you can try showing up to the pre-trip meeting even if you are waitlisted.

we are super over-prepared, since it is a learning exercise for winter school beginners and due to winter school safety guidelines

I chose the easiest hike possible, since I know I’m not really in shape despite biking on average 30 minutes a day (I bike slowly), and I don’t have experience hiking, so I don’t know if 7 miles is too much for me or not. I don’t want to drag my group down.

I still prepared for this hike quite a bit, which helped make it a mostly comfortable and enjoyable experience instead of one where I was freezing my extremities off. Biking in sub-zero weather forced me realize I need to invest in proper winter clothing too.

Over the last few weeks,

  1. I bought Neff Women’s Digger Gloves (black) off of SteepandCheap, since I thought they were skiing gloves that they would be fine. They were such fail I returned them. Maybe they require liners underneath for people with cold hands like me :/
  2. I went to Harbor Freight in Medford, MA and discovered Ocean State Job Lot next to it, where I bought lots of non-cotton items: liner socks for $2.50, wool blend tall socks and boot padding socks for $3 to $5 each, a pair of thinsulate 40g gloves for $5, and fleece leggings for $5
  3. I went to Target in Somerville, MA and discovered CWPrice, where I bought a base layer (pants+shirt) for $10
  4. I dug out my orange sweater and grandma’s windbreaker (:/ she passed away a few years ago)
  5. I learned from Cappie to tie cloth or a scarf around my nose and mouth to keep my face warm. This tactic does tend to fog up my glasses. I need to remember to wear contacts, although I’ve gotten better about breathing with my mouth in overbite formation so that the hot air is redirected through the bottom
  6. Jordan from MITERS lent me a pair of thick Bonfire gloves that seem to be on par or slightly warmer than my thinsulate gloves. He found them lying around for months so he gave them to me for free.
  7. Bought a magnesium fire starter at harbor freight, and a compass and whistle from MITOC

Now, my everyday wear is:

  • 3 leg layers, 3 top layers, 2 layers of socks, a hat, a scarf, and the thinsulate gloves

On the hike in around 20F I wore

  • 3 leg layers (leggings, base layer, and jeans, because I didn’t have thick / wind or water-proof non-cotton shell layer. I notified my trip leaders and they brought polyester hiking pants, but I stuck with the jeans because it wasn’t precipitating and my legs felt warm just standing outside)
  • 3 body layers (base layer, my awesomely warm patagonia jacket, and a windbreaker) — no poofy layer was needed
  • Two socks
  • Rain boots with liners (winter hiking boots would have been better, but it is such as hassle to leave a deposit and check in and out equipment, even if the monetary cost is already much better)

My toes were painfully cold for 1/3 of the hike and then suddenly warmed up in such a way that at first I was afraid they’d gone numb. Then they were nice and warm. Perhaps this phenomena was due to cold-induce vasodilation. I wish I didn’t have to deal with painfully cold toes at all though, and I asked some of the other hikers and their toes were warm throughout! I’ve always had problems with cold toes though.

frozen lake
Noanet Peak gave a view of the Boston skyline

It was an interesting experience, hiking on snowy trails. A lot of normal people passed us, running with their dogs or walking on skis.

pawprints!

It was a fun group. We joked about “traversing noanet” and “bagging noanet peak” (387 ft) 🙂

I look forward to the next hike. I learned that MITOC Winter School doesn’t teach you first aid, and some of these were covered in lectures that I missed, but I things I want to learn / hands-on:

  • use a compass (oops I missed this lecture, ssshhh I am supposed to know it before going on a hike)
  • emergency signals
  • start a fire in wet conditions
  • wilderness first aid
  • use a stove
  • other TMI things (there was such a great TMI lecture during the second set of mandatory lectures, covering all the female-specific issues) (many things are different in winter — you can’t dig a hole for your poop, for instance, because the ground is frozen)

I want to go on an overnight winter trip too, but they all tend to be for intermediate hikes and up. I suppose there’s next year, and I can first practice with easier spring weekend trips.