This is just a compilation of a bunch of content I’ve been producing (:'() instead of doing my work
=====
In short: “We can either run out of everything by a little bit over a couple months, or run out of everything really badly and really soon.”
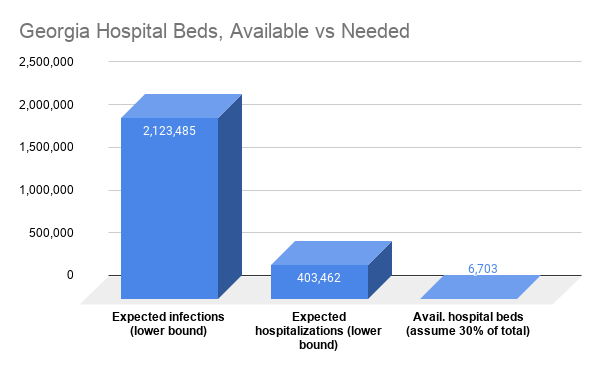
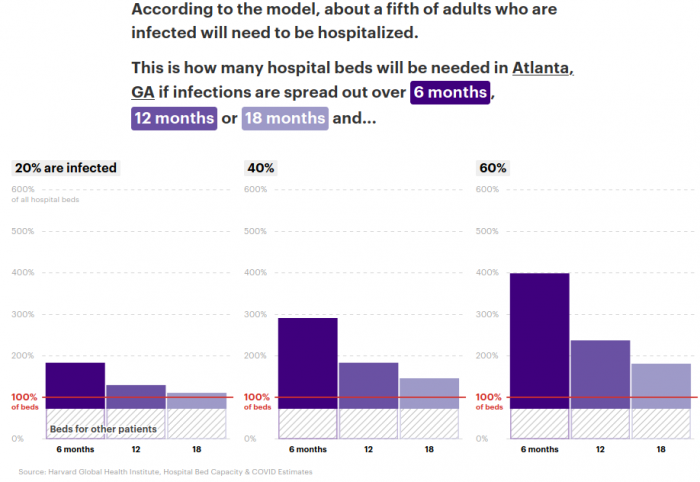
Slightly longer: “The math is eerily simple: Georgia’s population is 10 million. 20% will fall sick, and of those, 20% will end up hospitalized: so, 400,000 people need hospital beds. However, the state only has 22,000 available beds. But it’s even worse than that: 70% of beds are in use, so we only have 6,600 beds. And the 20% infection rate is if we take action now — otherwise, it’s 60%”.
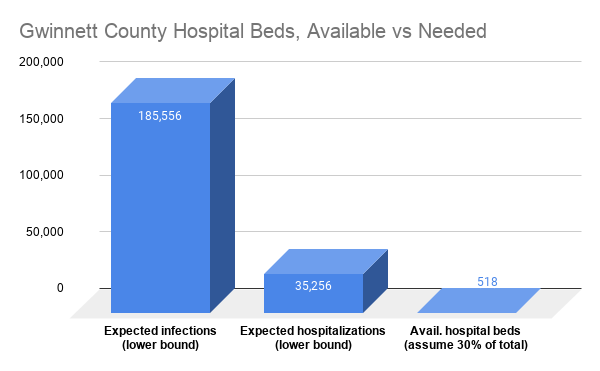
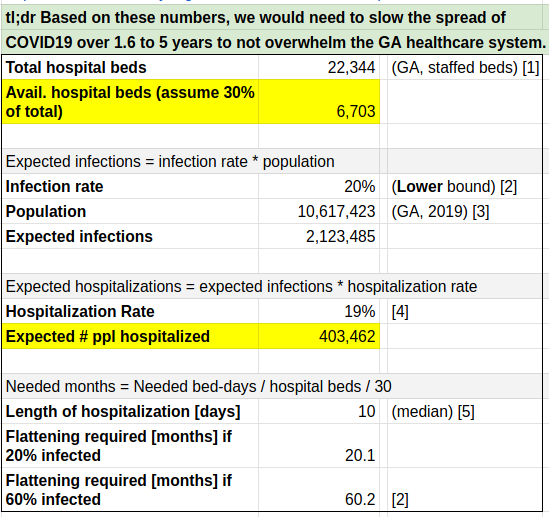
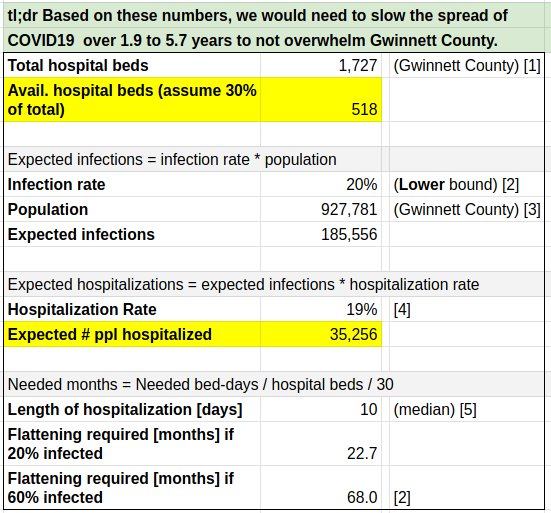
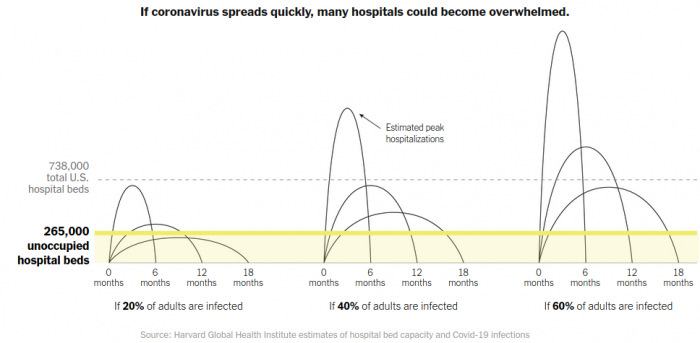
Based on the concept of “flattening the curve“. I ran a rough but straightforward analysis specific to our state (Georgia)’s hospital capacity. I graphed the number of hospital beds against expected hospitalizations. Based on these numbers, we would need to slow the spread of COVID19 over 1.9 to 5 years to not overwhelm the state healthcare system.
he NYTimes came out with an analysis by Harvard epidemiologists that used the same statistics to reach about the same conclusions on a national level (but broken up by counties). You can also go here to select “Atlanta, GA” to see the regional analysis, I have screenshot’d their analysis below;
This analysis is important because overwhelming our healthcare system could increase the mortality rate 10-fold, not to mention all the deaths from people with normal sickness that can no longer be treated (e.g. organ transplants are already shutting down since they require ICU beds). The 10-fold is according to an analysis of the difference in mortality between the overwhelmed Wuhan and its surrounding districts, after lockdown.
=====
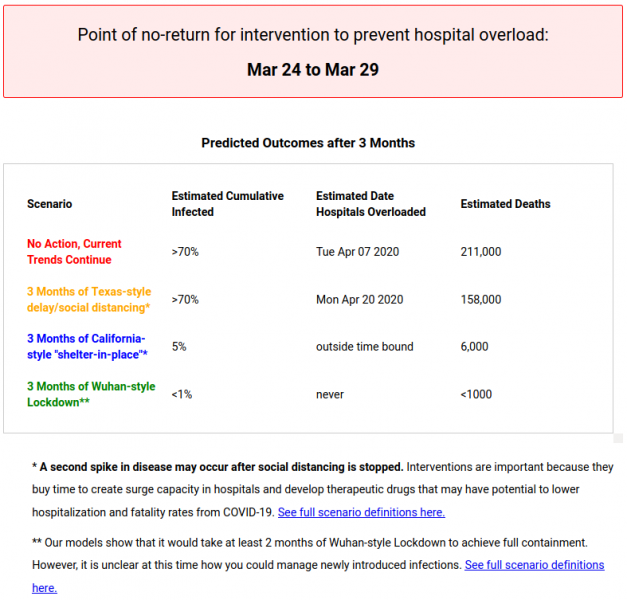
I also include here an analysis from https://covidactnow.org/state/GA showing why we need state-wide shelter-in-place as opposed to the current “urging”
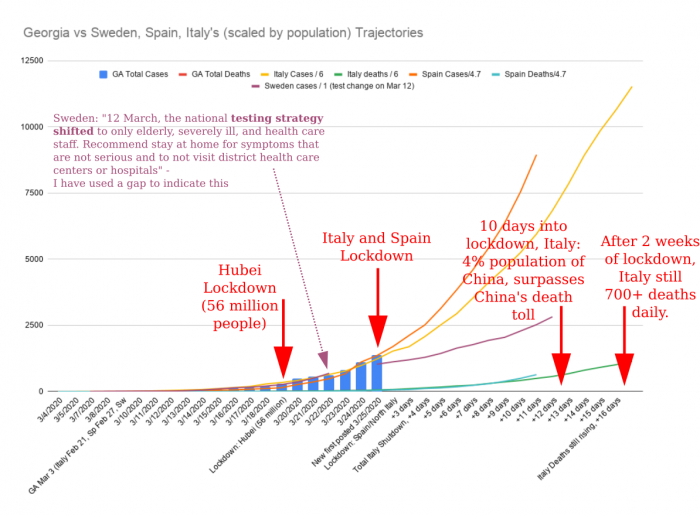
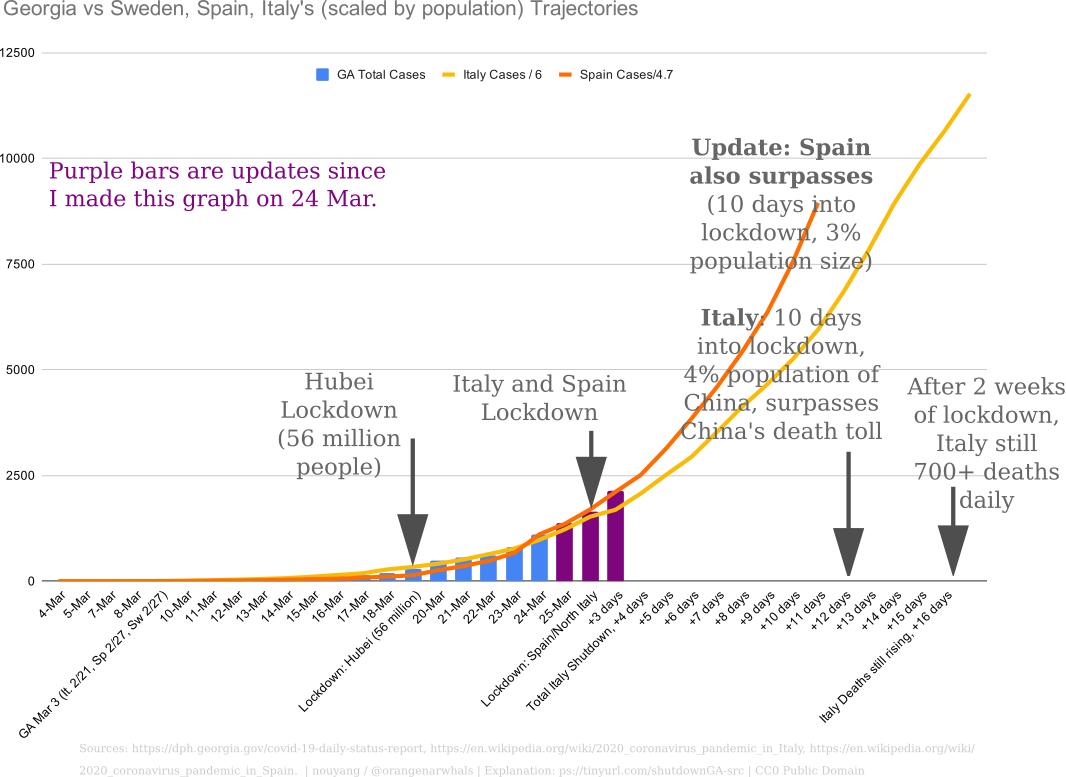
From Italy: “The beginning of the outbreak had the exact same number of infections in China, Italy, and other countries. The difference is that China strongly and quickly locked down Wuhan and all of the Hubei region 8 days before Italy. Just 8 days of delay for the Italy lockdown will result in an enormous increase in the number of total deaths in Italy with respect to China.”
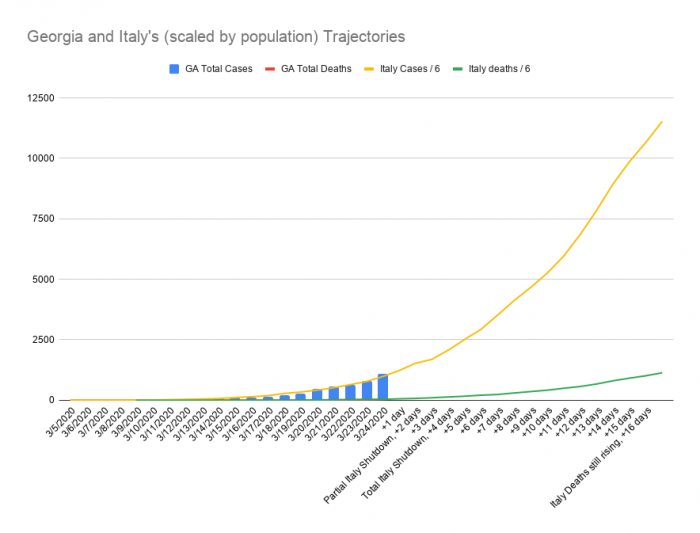
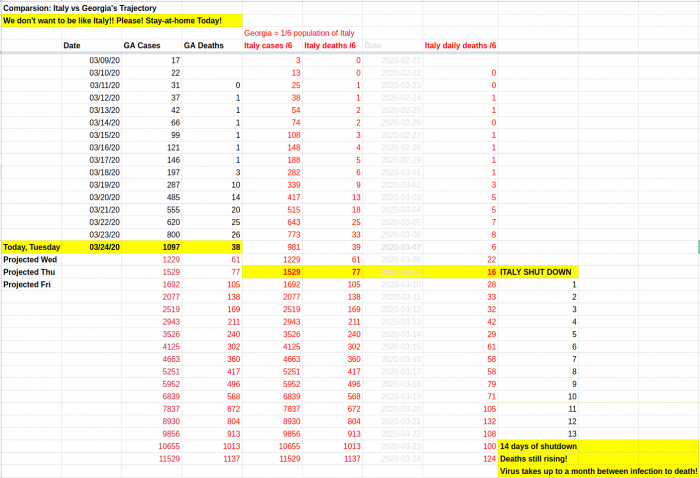
We can see the trajectory in Italy, a nation of 60 million people:
- Feb 25: 322 confirmed cases and 10 deaths.
- March 1st: 1694 cases and 34 deaths total.
- March 9th, Shut down. 9172 cases and 400 deaths total.
- On March 19, 475 people died in a single day (3k deaths, 35.7k cases total).
- On March 24, 743 people died in a single day (6.8k deaths, 69k cases total). The effects of the lockdown will not show up for a few days yet.
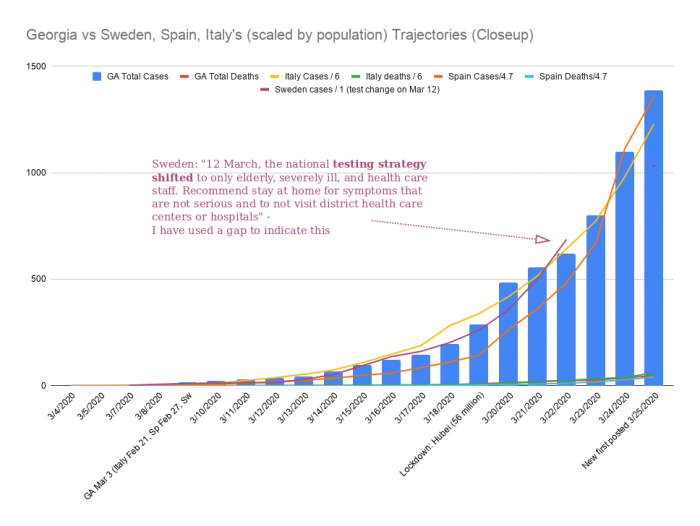
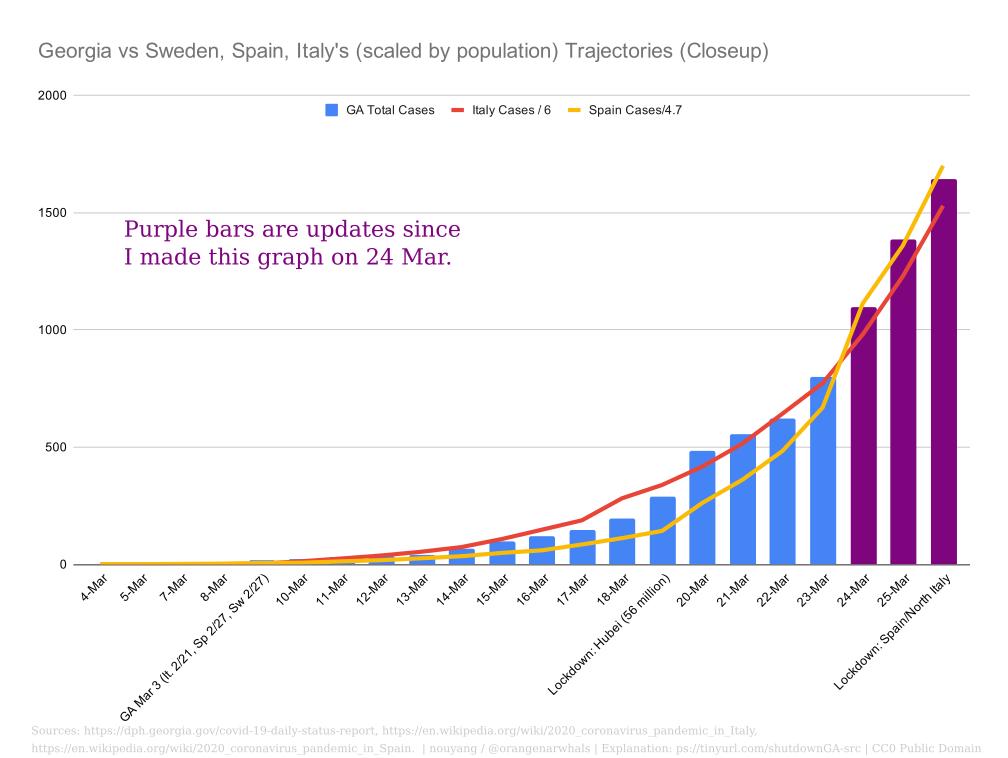
Georgia has 10 million people, not 60 million.
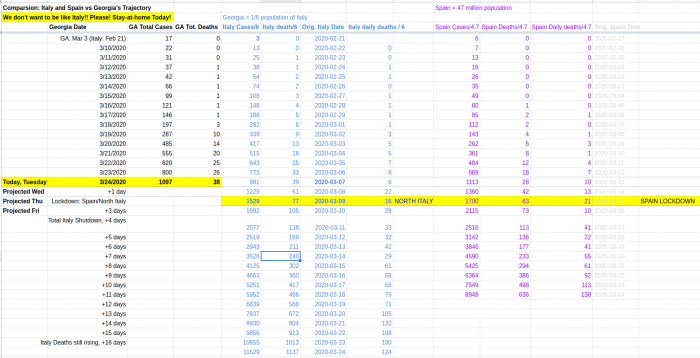
- March 19: We have 287 cases, and 10 deaths total, but we have 1/6 the population, so we are at the equivalent of (287*6 ~= 1700) cases. We are at Italy’s “March 1st”, we cannot wait to be Italy’s “March 9th”!
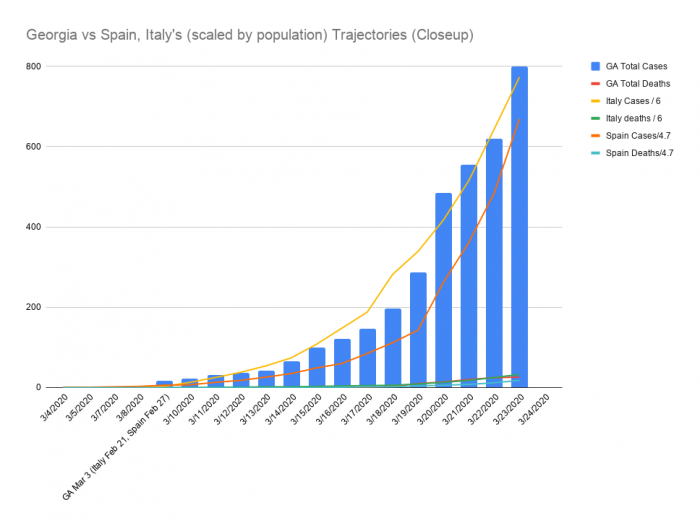
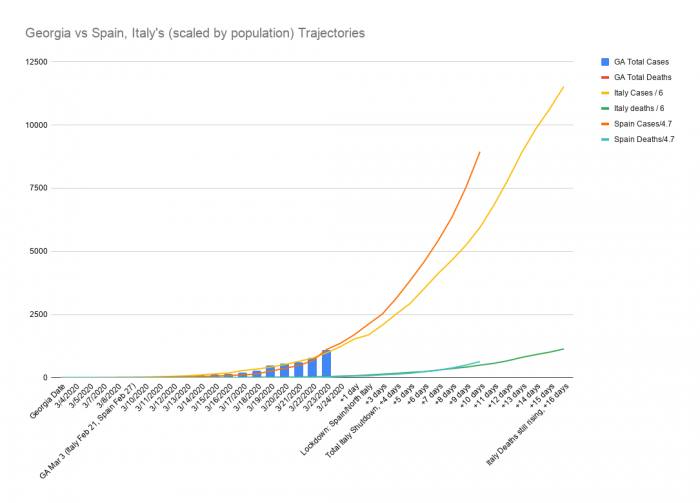
- Update: March 24: We are still following the exact same trajectory as Italy. We have 1026 cases, and 32 deaths total, but we have 1/6 the population, so we are at the equivalent of (1026*6 ~= 6,156) cases. We are at Italy’s “March 7th”, we cannot wait to be Italy’s “March 9th”!
Italy surpassed China in number of deaths on Mar. 19, and as of Mar. 24, now has 2x as many deaths, in a population that is only 4% the size of China. We cannot wait another week to shut down, we must do so now!
China shutdown a population of 56 million people (in 16 cities) with less than 1300 known cases. In the epidemic trajectory, Georgia passed that on Mar 19! After locking down, Wuhan built a 1600 bed hospital in 10 days, and still was overrun. But they were able to draw on resources from surrounding regions that had shut down earlier in their own trajectories. By shutting down early, we help our neighbors too.
From the above rough analyses, I would like to advocate for two more things in addition to shutting down:
- Increased capacity: After locking down, Wuhan built a 1600 bed hospital in 10 days, and still was overrun. Look for any way to increase hospital capacity, including building makeshift hospitals. Capacity includes freeing up ICU beds, sourcing person protective equipment (PPE) (through donations or volunteers sewing masks, etc.) and ventilators, recruiting nurses and doctors, changing malpractice regulation
- In the medium-term, plan for lots of testing and contact tracing: We can’t actually stay shutdown forever. South Korea, China, and other nearby countries have both pursued aggressive tactics that seem to have worked. China reported 1 new (domestic) case yesterday, so there’s hope.
An additional benefit of advocating for shutting down widely is that “hotspots” that break out in 1 to 2 weeks will be able to draw on resources from other regions, just as Hubei Province did (thousands of doctors and nurses from across China voluntarily flew in to help).
For the medium to longer term measures, please also see this sobering Imperial College study from 16 March 2020 which applies Italy’s figures to Great Britain and the United States.
No employer is going to feel urged to close down, and vulnerable populations are still going to work. Humans are social by nature and won’t feel urged to not see friends. By hesitating about stringent state-wide measures, we only increase deaths and prolong the economic crisis.
https://docs.google.com/document/d/e/2PACX-1vSrngUnL_zxOYMNuRC2WYDSv5YF9myq76vUURpV10Q5E_uXpX7EI1zfG1COVX6uBcBZLM-DcLq40MZo/pub
Credits
- Prof. Cathy Wu who did this same analysis for the Greater Boston Area — after she included me in the analysis, I did the same for Georgia, which resulted in this document
- Councillor Quinton Zondervan, who used the comparison to Italy in emailing his city
- Daniel Curtis, who helped summarize and refine this
Sources
[1] Am. Hospital Directory https://www.ahd.com/states/hospital_GA.html
[2] Prof. Mark Lipsitch https://news.harvard.edu/gazette/story/2020/03/hundreds-of-u-s-coronavirus-cases-may-have-slipped-through-screenings/
Proportion of the global adult population will ultimately be infected by the virus, officially named SARS-CoV-2, Lipsitch revised downward his estimate, to between 20 and 60 percent. He said that the wide range is an indication of continued uncertainty in the data, but that the downward revision from an earlier estimate of between 40 and 70 percent stemmed from lower estimates of the virus’ transmissibility. https://news.harvard.edu/gazette/story/2020/03/hundreds-of-u-s-coronavirus-cases-may-have-slipped-through-screenings/ March 4
[3] US Census https://www.census.gov/quickfacts/fact/table/gwinnettcountygeorgia/PST045218
[4] Journal Am. Medical Association The Coronavirus Disease 2019 (COVID-19) Outbreak in China—Summary of a China CDC Report
“JAMA Feb 24, China: Spectrum of disease (N = 44 415),Mild: 81% (36 160 cases), Severe: 14% (6168 cases), Critical: 5% (2087 cases)NOTE: Based on the original journal source, I believe that the STAT news article made an error in stating 15%, and have revised this to 19%, and removed it as a source” https://jamanetwork.com/journals/jama/fullarticle/2762130 Feb 24
[5] Journal Am. Medical Association Clinical Characteristics of Patients With 2019 Novel Coronavirus (2019-nCoV)–Infected Pneumonia in Wuhan, China
Hubei province: “Among those discharged alive (n = 47), the median hospital stay was 10 days (IQR, 7.0-14.0).” https://jamanetwork.com/journals/jama/fullarticle/2761044 Feb 7aa
p.s. Doctors from Zhejiang University wrote this handbook based on their hard-earned experiences, please share if you know healthcare workers
https://projects.propublica.org/graphics/covid-hospitals?geo=Atlanta,%20GA
https://covidactnow.org/state/GA
https://www.nytimes.com/interactive/2020/03/17/upshot/hospital-bed-shortages-coronavirus.html
Georgia is not somehow different than Italy, Spain is not somehow different than Italy
Interactive: https://docs.google.com/spreadsheets/d/e/2PACX-1vScKBdB_gzoN3_MjjUpf6yUlCeTA-eBpkBkVaRc-EcO3RbBxwvIMnhUci3ap3BsVL9yHO_AvAfqAfXk/pubhtml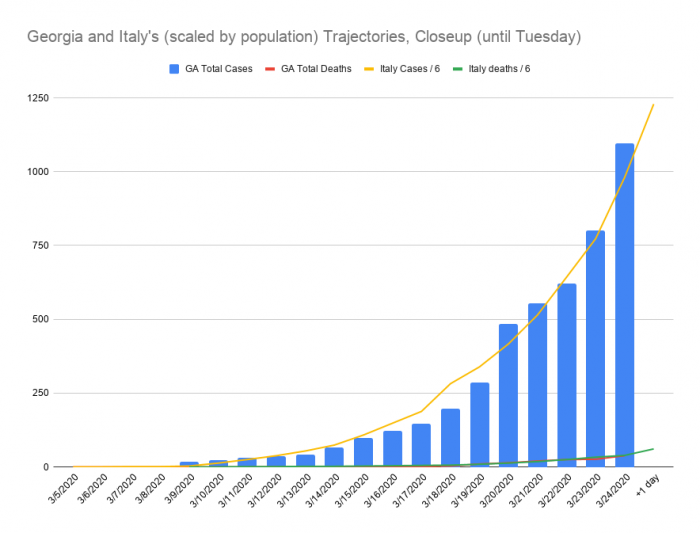
60k – https://www.change.org/p/tell-governor-kemp-shut-down-georgia-today-save-lives-shutdownga/dashboard
Started it on Friday. God. Wish we’d shut down. Too little too late. Have to make sure we shut down within the next 2 days. How?? feels impossible.
Additional pressure.
- Suggest they collectively sign a letter to the governor (example here).
- Give them numbers specific to GA or your county.
- Tell them Georgia Municipal Association today “urged all 538 cities in the state to declare public health emergencies and shut down non-essential businesses”, even including ordinance councillors can just fill in.
Kemp’s form is here, his phone number is 404-656-1776 (again please be polite).
And, we’re falling behind other states in our orders, at the same point outstripping them in growth rate of cases and deaths (1026 cases, 32 deaths). See this NYtimes comparison of what other states have done, and a more detailed one from the National Governor’s Association.
As before, our website is #shutdownGA, there’s a editable spreadsheet.
Let’s get this “stay-at-home” happening in GA. The exponential trajectory has been obvious to us, let’s make it obvious to state legislators and Gov. Kemp.
https://www.change.org/p/tell-governor-kemp-shut-down-georgia-today-save-lives-shutdownga/u/26074735
s to contact state legislators, as they control the state budget and can collectively pressure the governor [1]. I liken it to tech support: If your computer’s broken, you don’t expect tech support to read your mind, you need to file a ticket. For state legislators, even five phone calls about the same topic would cause them to take notice.
Alternatively, you can go to GAMyVoter and in the bottom right it tells you want: “Georgia Senate” and “Georgia House”. [2] If you click either link, you can then pick the name of your legislator on the next page, which takes you to a page with the phone number and email of the legislator.
The key points to bring up are:
- We’re on same path as Italy,
- In Italy, too many people died (since hospitals were overwhelmed)
- We should shut down so fewer people die
If you’re on the phone, end by getting their email to send them the details*, and mention that there’s a petition with thousands of people who agree.
First 8000 Georgia Signatures
Footnotes
[1] The reason is that state legislators actually control the state budget. They can also grant or remove powers to the governor. Although individually they have much less power than the governor, who has extensive staff and support, collectively (all 200 of them) have a lot of power. So, they actually have a lot more influence over the Governor than our federal level representatives (Sen. Loeffler, Perdue, and your Rep.). For instance, one thing state legislators can do is say, “Governor, we will only give you this money if you do such-and-such.”
[2] Yes, the district number is different for federal-level house of rep, for state house, and for state congress. For a rough idea, see the three statewide maps at GeorgiaInfo.
PSA: The next general election, where state legislators are chosen, is Nov. 3, 2020.
=========
