EDIT 4 Dec 2012:
As of august 2012-ish (I haven’t tried to run hexapod since then, because I ate my pololu controller sometime while dragging my hexapod all around the country this summer >__< Ugh I fail at taking care of expensive electronic things), there are some syntax changes if you’re using the latest version of arduino because newsoftserial is now built into arduino, not a separate library.
This version of the code is also slightly better organized…
https://github.com/nouyang/18-servo-hexapod/blob/master/pololu_aug17-2012.pde
[updated because i saw a link from http://forum.pololu.com/viewtopic.php?f=16&t=6188&p=29520#p29520]
EDIT 18 March 2013:
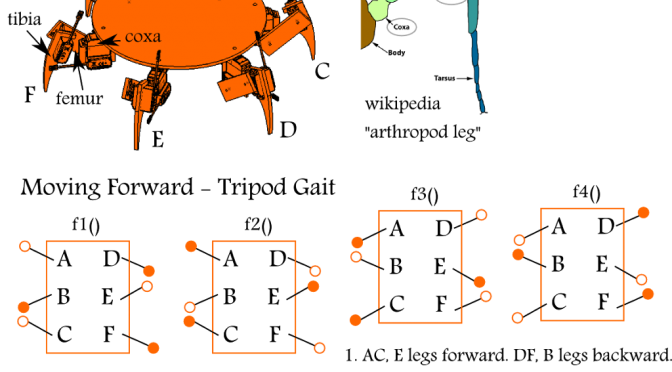
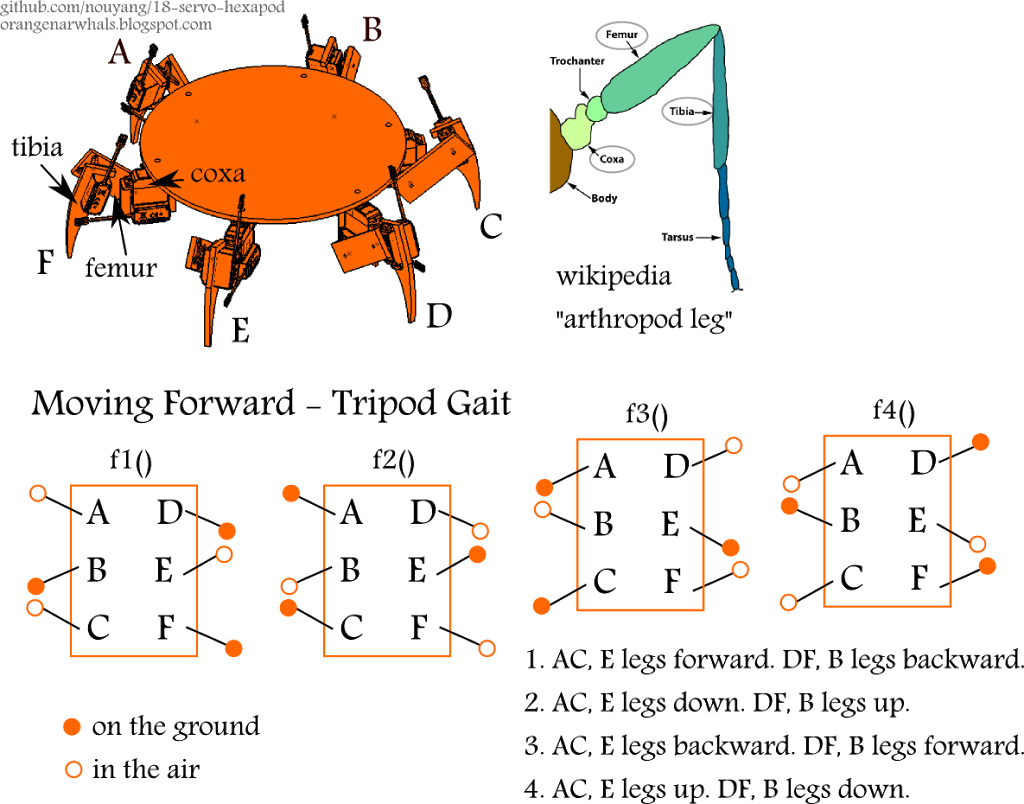
I made a video about my hexapod.
Also, a diagram to explain what is going on in the August 17th revision of the code:
[updated because I saw a link from hexy forums]
=====
this post because pololu has
awesome documentation but dear lord is it long and difficult to wade through when I’m fairly new to this stuff. Also, I finally figured out the sad-servo problem that was plaguing me for a week.
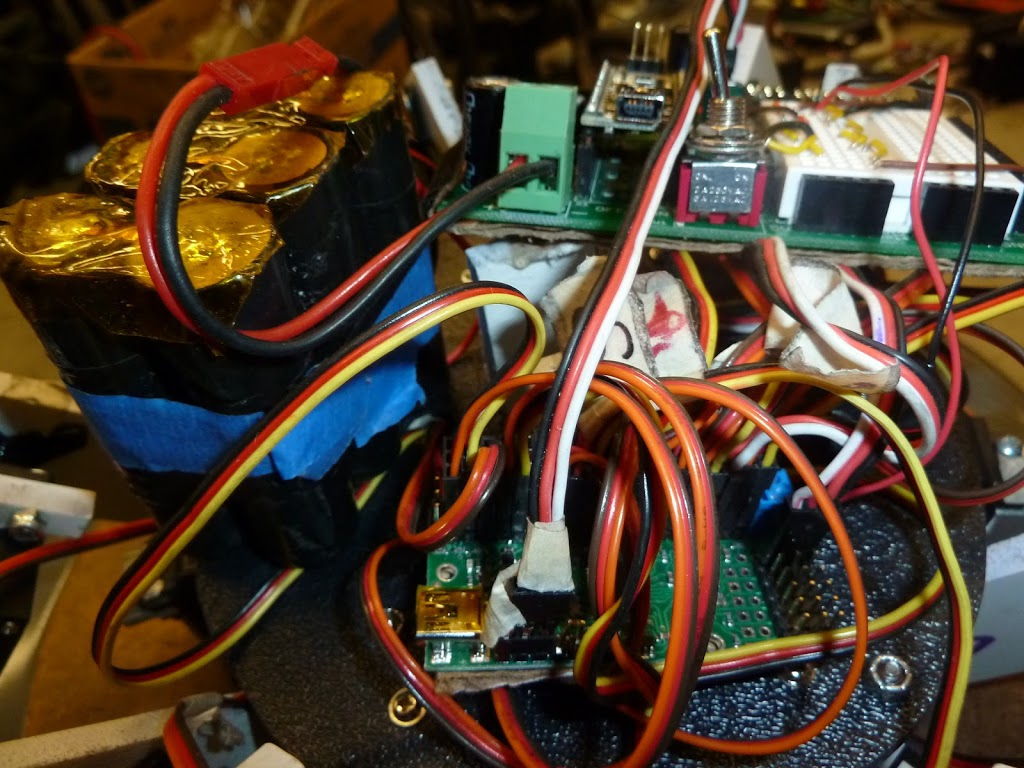
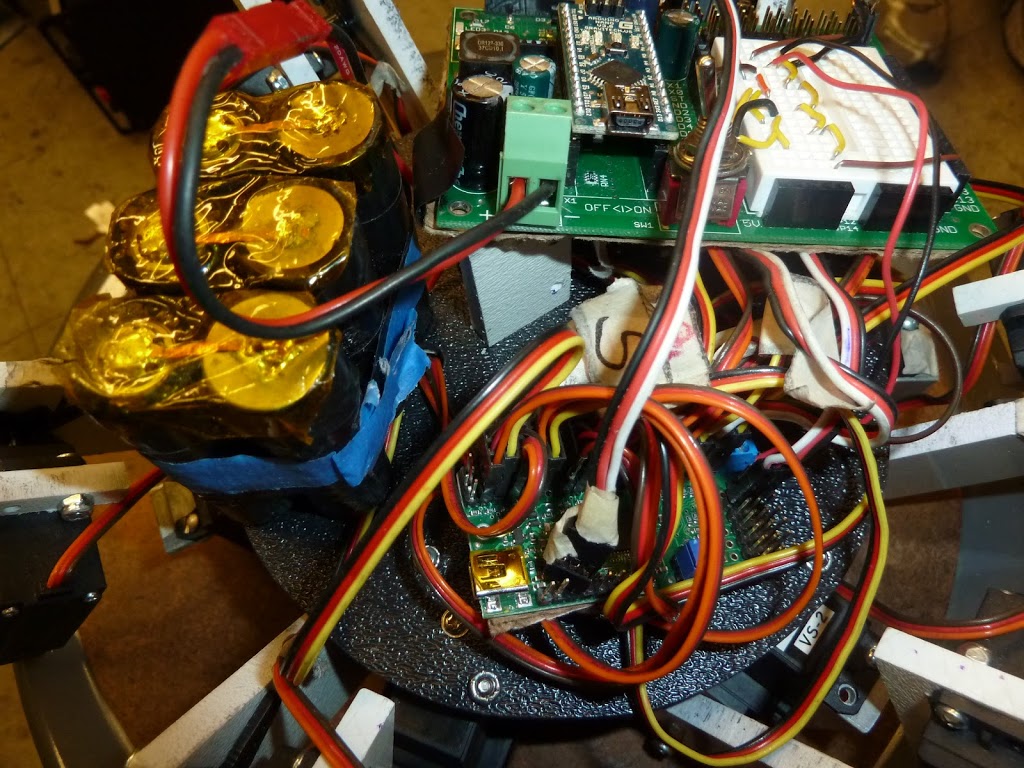
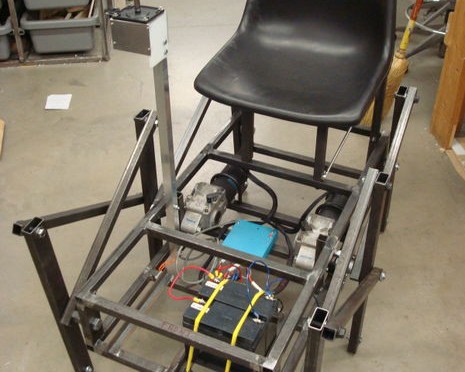
 |
| Fig. 1 |
My current setup: eighteen servos on maestro pins 1-18 (pin 0 left empty), VSRV=VIN jumper has been removed. 8.4V battery pack fed through 5V linear regulator on carrier board. The servo wire with with masking tape comes from PIN2 of the carrier board/arduino setup and is supplying the pololu controller with GND, VIN, and the serial signal. Red and black wires going from breadboard on carrier board to VSRV on maestro.
If all that didn’t make sense…
Steps
a. Hardware
- Look at labeled picture http://www.pololu.com/docs/0J40/1.b
- What you need on pololu-side: serial going through to RX pin on pololu, power to VSRV and VIN, ground to GND, and lots of servos
- According to our eventual code:
#include <NewSoftSerial.h>
#define txPin 2
NewSoftSerial mySerial(rxPin, txPin);
void setup(){
  mySerial.begin(9600);
  delay(1000);
}
we should take a servo female-female wire, put one end on servo male header pins for pin 2 of Arduino.
- RX/TX and Microntroller power: Put other end white wire (or yellow or whatever wire is SIG) on RX on maestro, and red (VIN) and black (GND). Should look like pic above, the wire-with-masking-tape, with black facing “out” toward the USB port.
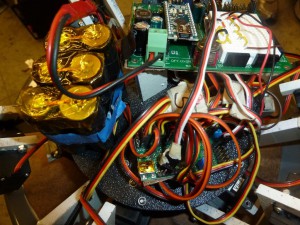
- Servo power: see pic above, the two non-servo cables (the red wire and black wire going to the breadboard) are screwed into the blue terminal block on the maestro. The breadboard has 5V and GND from the 8.4V battery going through the linear regulator on the carrier board. I’m actually stealing 5V from a servo pin. See the black wire soldered to Dig9Output, 5V in the upper left of this pic (which is actually carrying 5V, not GND) (via a female header pin so I wasn’t soldering straight to the carrier board pins) (ignore the gazillion extraneous wires)
- Remove VSRV=VIN jumper
Why remove the jumper? Well, a. Makes the pololu RX pin happier (compare to setup below) b. Setting that jumper seems to current-limit the power going to the servos, leading to my sad-servo symptoms. aka unable-to-walk hexapod.
 |
| the single pin (pololu RX) inside the masking-tape-servo-cable is a sad pin. The cable also falls off often. |
I used the jumper originally because I was thinking I would need two batteries (one for VSRV one for VIN) or something otherwise. But hey look, it’s setup to be neater without the jumper, I’m still only dealing with one battery, and my hexapod doesn’t work with the jumper on. u___u
b. Software
[edit 27 Jun 2011 I fixed the many errors in my post, as pointed out on the pololu forums: Pololu maestro and arduino again]
1) newsoftserial should be downloaded from the internet and the folder inside the zip put in (path to where you unzipped arduino)/arduino/libraries/ (e.g. for ubuntu 10.10 via the repository, /usr/share/arduino/libraries)
And the code from http://www.pololu.com/docs/0J40/5.e or from above means:
a. BYTE is a parameter that pecifies the base (format) to us http://www.arduino.cc/en/Serial/Print
b. target is a non-negative integer less than 8192 (it can be written in binary notation with 14 or fewer digits)
e.g. 6000, or in binary: 01011101110000
c. 0x7F is 01111111 in binary, which infinity zeros to the left, so “&”ing (bitwise AND) it masks out all the digits in target (when target is written in binary) except the last 7 digits (only 1 AND 1 == 1. all other combinations == 0)
  01011101110000
& 00000001111111
= 00000001110000
d. right shift operator, shifts last seven digits (numbers 7 through 13) in target off into empty space and so now the “new” last seven digits were originally bits #0 to 6 (see color-coded pololu doc). Mask with 0x7F again, just to be sure.
  01011101110000,>>7 to:
  00000000101110, then:
& 00000001111111
= 00000000101110
You can see the code I used with Fig. 1 here: https://github.com/nouyang/18-servo-hexapod/blob/036271da7e66b80ff7ea732ea13b7028b43d28ac/pololu_jun17a.pde
The main difference from the default code is that I mapped the values so that I could mindlessly port code from arduino-“Servo.write()”-style to pololu-“settarget()”-style.
void settarget(unsigned char servo, unsigned int target)
{
  target = map(target, 0, 180, 2400, 9500);
Also feel free to compare to original arduino version: https://github.com/nouyang/18-servo-hexapod/blob/master/arduino_may13_2011.pde