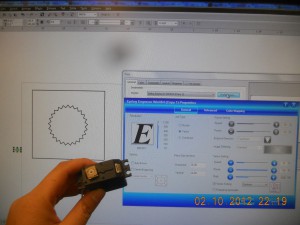
in which i rediscover the lasercutter: screw-propelled vehicles, making servo horns, and figurine+ruler keychains

i have been making a lot of things lately.
Never enough!
But yes, I rediscovered the lasercutter, and there happens to be one upstairs of MITERS now.*

* [I should really get a Real Laptop (that I can CAD on) and then I have no excuse to hang around upstairs when the MITERS computers are occupied. (or just set up another computer downstairs…) but in the meantime there are excellent computers are the third floor (which as a bonus are tucked away in corners. I have a special affinity for corners).]

My convoluted group loyalty issues aside, last week there was epic snowage, so much that MIT closed down. So then I decided to build a snowbot, or rather a screw-propelled vehicle.
http://en.wikipedia.org/wiki/Screw-propelled_vehicle

Turns out some excellent undergrad wrote a thesis on this topic, with pictures and build and equations!
http://www.wpi.edu/Pubs/E-project/Available/E-project-031411-150953/unrestricted/Ice_Inspection_Robot_MQP,_Final_Report.pdf

So he made his prototype out of PVC pipe. Specifically, giant!diameter!PVC pipe for the augur and 1/4” diameter pipe wound around the large pipe for the threads on the augur. His second revision was tube aluminum with specialty-ordered sheet steel threads (the two were held together with “Loctite E-20NS metal epoxy”. Wow. Heavy-duty epoxy).

Well! I wanted to complete snow-bot in a day so I decided to make it out of coke can + cat 5 cable hotglued onto it (with revision two to be 3d printed).
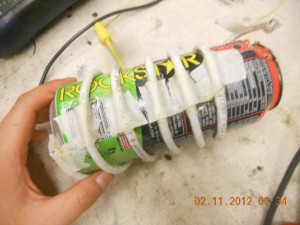
that is so totally a workable augur. right?

This err didn’t happen. I got distracted by other lasercut projects. But yea, the plan was to attach two continuous rotation servos to turn the coke cans and voila, I would have instant prototype.

note: for the sake of sleep this is going to be an overview post with more detailed / better formatted / all my files–posts to come, but in case I don’t get around to those:

My first step was to discover that I had SpringerRC continuous rotation servos, perfect for the job, but no servo horns. (First of all, note that servo horns are NOT all compatible). Oh noes! Well. Turns out, they are pretty easy to make, despite the total lack of help from this site which just says “lol they are easy to make”:

http://makeprojects.com/Wiki/Servos

A bit of googling and double-checking by counting by hand, I find out futaba-compatible horns have 25 “teeth.” And using calipers I determine the outer and estimate the inner diameter, for which I get roughly 0.02” which order-of-magnitude agrees with the super-accurate measurements made by this dude.

I also, via the internet (and later by trial-and-error) find 3mm acrylic-like plastic to have a kerf of about 0.005”.

So using coreldraw (or inkscape), there is a polygon/star tool, and I enter 25 pointed star. I then eye-ball the “sharpness” parameter, which you have a bit of slack on (the horn teeth just needs to fit between the servo teeth). I also initially set the x-y width to be 0.235”, the exact outer-diameter I measured. When cut out, this servo horn a bit loose but slides onto the servo and turns the servo when it is turned.
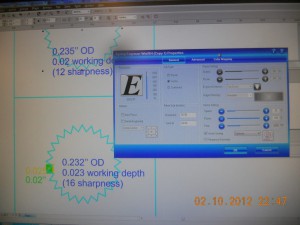
yes. my camera has a permanent dust speck somewhere inside it…

Then I iterate. You can see I drew a green and yellow rectangle, for 0.02” + 0.005” kerf, to get the “sharpness” (pointiness of the star) setting right (if you draw it out, to account for kerf, the OD of the star should be smaller by 1/2 kerf and possibly the star’s inner corners should go 1/2 kerf deeper, hence why 16 sharpness with the inner corner somewhere between the length of the green and yellow rectangles. I’m not 100% how sharpness is interconnected with the diameter of the star so it’s hard to say what the exact adjustment should be).
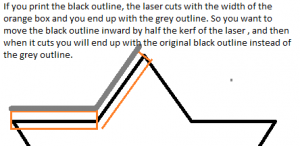
f* yea MS Paint

The laser settings I used for a 120W epilog laser:

Of course, I don’t finish over the weekend and Monday I walk into 2.007 lab (which I am undergrad assisting with, UAing, this term) and there are a gazillion springerRC servos and servo horns. But that’s beside the point.

I also realized that part of my search criteria for LIFE aka a career included “access to lasercutter,” but maybe I am supposed to look for a job that pays well so that I can buy my own lasercutter. Hrm.

Hrm…

Anyway, what else happened? Oh right, Jordan‘s birthday came up. Because she is awesome, I decided I should make her a birthday gift. Inspired by Kat Struckmann’s cruftmas (putz hall secret santa tradition where gift has to be entirely made of cruft, aka free stuff. Oh right, I made a sheet steel bookstand for my secret santa and learned the importance of product design, because the gal I gave it to was like “wtf is this, a shelf?” ^^; #toblogabout) gift to Sterling Harper, aka by the Archer TV show:

image courtesy of jordan.

Oh gosh. I had to use so many programs to make this, I don’t even. No. Anyway, the general idea is to use various selection tools (oh robutts don’t use the polygon tool by itself, it’s so easy to accidentally hit escape and erase all your work with the selection, make sure to use quick-mask model with shift-Q — everything this is orange is not in the selection and everything that is white is) in GIMP on the original image (see: her blog), export selection to path, save path as an SVG, import that into inkscape, use various path tools (difference, something like that) to merge the Person outline with the rectangle outline that I want to cut out to create a stencil-like effect, realize that coreldraw hates inkscape SVGs for whatever reason, save inkscape file as PDF and import and clean up import in coreldraw, still recreate a lot of the work in coreldraw because I am more familiar with sending coreldraw files to the lasercutter, find flowers on openclipart, and then spend a few hours playing around with the DPI / whatever settings because I want to get a raster image of the photograph etched onto the outline. This… doesn’t go so well. Somewhere along the way I decide to add a ruler to the thing, because really, useless keychains may as well have rulers on them. I discover the magical coreldraw “blend” tool, where I can just draw two lines at the beginning and end and then specify how many copies I want to use to blend between them (since the end and beginning lines are the same, all the intermediates are the same as well).
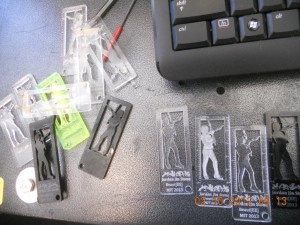
so many rejects. luckily this is all from small bits of scrap other people would probably just throw right out.

Then there were other lasercutter shenanigans, but that’s for another time. Briefly…

Oh gosh that is a topic in and of itself. Inkscape has a gear generator, but then I tried to x-y scale that, so the pitch becomes something strange, and then I import that dxf into solidworks to make a 3d model and also to measure the pitch and other things, and later export it as a dxf from solidworks to coreldraw … … apparently solidworks has a gear generator in its toolbox. I should use that next time.
Oh, food-wise:

Oh also this excellent post on designing sninges, aka how to make acrylic bend:

http://blog.makezine.com/2011/12/08/designing-sninges-in-laser-cut-acrylic/

Guys I should just go do lasercut etsy things. Forget scaling and engineering, and go be a craftsperson >__>;; and sell things at cons or something.
Oh and speaking of bending acrylic, 
Hrm this is rich with possibilities. I CAN EMBED SO MUCH ELECTRONICS IN HERE with this 3d possibility.
Heck I could like embed a mini hexapod in there probably. With a button. So I can hit the button and pop out a small hexapod army from brace/ankle-lets.

HRM. 
Hexapod armies.

*reminds self to talk about microcenter and finding hexy, the kickstarter project funded just seven months ago, on the shelves there….* #toblogabout

Okay, when my blog posts get to the topic of hexapod armies it’s a definite sign that I am procrastinating. Time to get back to CADing snowbot. (CADing a spontaneous robot? wtf? MIT, what have you done to me, that I would prefer to CAD and lasercut something instead of putting things together by hand until it works…)

==
additional resource: list of screws, in case you lose those screws for the horns:
http://www.rcgroups.com/forums/showthread.php?t=914983

I made a video about hexapods.

I made a video about hexapods! yay. I’d estimate it was a full 4 or 5 days working on it, learning final cut pro along the way. It basically covers my journey through 2.007 two years ago, and is meant to be a resource for students in the class.

Note to self: shortcuts: < > ctrl-= alt-w

Meanwhile, I think an instructable a week sounds like an excellent plan for Spring semester senior year.

braindump, playing around with flask / python / vim / bootstrap

So, I didn’t get into 2.72 build-a-lathe-you-can-sledgehammer-on class, which my brain had decided was my last salvation at actually believing I qualify for graduating as a mechanical engineer from MIT in June. I guess I’m just doomed to make shoddily put together things until I get real life experience or something. I guess the example that comes to mind is makerbot v1, but there’s also something to be said for getting something out the door instead of being worried about whether it is Acceptable.

It’s also supposed to snow a lot so school was canceled for today, so I decided to sulk by coding all day. Bletch, take that course 2. Or something. XD; There’s a course, 6.170 (no, not your grandmother’s 6.170, which was toned down into today’s 6.005; this is now software development principles through the view of web app dev apparently) which I might follow along with. It’s taught in ruby this  year, but it was taught in flask last year so there’s some nice material on stellar. http://stellar.mit.edu/S/course/6/sp12/6.170/materials.html

I’m now following this cool step-by-step tutorial, http://blog.miguelgrinberg.com/post/the-flask-mega-tutorial-part-i-hello-world.

*** why isn’t this a one-step process. oh holy robots f*** this is a crappy state of affairs that this takes me several hours to set up properly.

=__=”

OKAY.
So.
Starting over.

1) make pretty bash terminal (with colors).

in ~/.bashrc,  comment out #force_color_prompt
then in ~/.bash_profile, add the line:
source ~/.bashrc

2) make pretty vi.

http://sontek.net/blog/detail/turning-vim-into-a-modern-python-ide
I chose not to use the install.sh script *shudders* It’s hard to undo and puts an insanely long .vimrc that I can’t understand onto my computer. So I followed the instructions

1. make ~/.vim directory
2. download pathogen, I kept forgetting to do this
3. add a gazillion plugins with git submodule add, as directed

3) ugh escape key = caps lock

http://stackoverflow.com/questions/397229/reaching-up-to-hit-the-escape-key-sucks-especially-in-vim

4) backup dotfiles on github

http://blog.smalleycreative.com/tutorials/using-git-and-github-to-manage-your-dotfiles/

…except, I just want that .vimrc file, so yea. I should stop using install scripts I don’t read through. *sigh*

5) update minibufexp
using https://github.com/fholgado/minibufexpl.vim.git
http://stackoverflow.com/questions/14404704/how-do-i-replace-a-git-submodule-with-another-repo

instead of https://github.com/sontek/minibufexpl.vim.git bundle/minibufexpl

note! http://stackoverflow.com/questions/8953777/vim-not-an-editor-command-minibufexplorer

Sometimes window arrangement gets messed up, so use
:vertical resize 20 
to get unmaximized tree explorer back.

Now, back to flask

http://blog.miguelgrinberg.com/post/the-flask-mega-tutorial-part-i-hello-world

~ note: python run.py doesn’t work; have to do ./run.py (?).

part V

http://blog.miguelgrinberg.com/post/the-flask-mega-tutorial-part-v-user-logins
If you try to run this code, there are import errors

ImportError: No module named openid

Appparently since Grinberg wrote his post, the pip install flask version is >= 0.8, so the syntax is now from 

from flask.ext.login import LoginManager

instead of 

from flaskext.login import LoginManager

See http://flask.pocoo.org/docs/extensions/ (I arrived there from this post
https://github.com/mitsuhiko/flask/issues/421)

resetting from zip file

Mm. At this point, I just downloaded the microblog-0.5 zip file, unzipped, did the whole virtualenv / pip install flask ordeal, ran ./db_create.py and ./db_migrate.py, and everything is now dandy.


part VI.

I didn’t have an image for my email address (well, I’d used plus addressing when signing up for Gravatar but not when signing into the google openID thing, and I didn’t feel like restarting my browser to disassociate myself from the google openID thing). The gravatar took a few seconds to update. To check the code was working, I used

flask/bin/python
u = Users.from app import db, models
n = users[0]   #In my case, when I print, I get
‘http://www.gravatar.com/avatar/’ + md5(n.email).hexdigest() + ‘?d=mm&s=’
 

This spits out
‘http://www.gravatar.com/avatar/79424cef70fbb561ff50512c2c03334f?d=mm&s’
which worked just fine in the browser, and upon refreshing the app, showed up in the app as well instead of the mystery-man human outline icon.

Well. Now I know why all those silly web-apps make me sign up for gravatar instead of letting me upload pictures. Because it’s easier to use someone else’s service…

Hmm, speaking of which. Adding facebook is surprisingly not so straightforward. Apparently it doesn’t play as nicely with openID (they’re not a provider). Drats, time to make more openIDs.
http://stackoverflow.com/questions/10083319/facebook-openid

part vii

http://blog.miguelgrinberg.com/post/the-flask-mega-tutorial-part-vii-unit-testing
I was kind of confused by this part (he explains in more detail later), but keeping the None values works and you can enter whatever into the email address for the admins list.

nrw@ubuntu:~/Dropbox/mblog $ sudo python -m smtpd -n -c DebuggingServer localhost:25
———- MESSAGE FOLLOWS ———-
From: no-reply@localhost
To: you@example.com
Subject: microblog failure
Date: Sat, 09 Feb 2013 15:09:04 -0000
X-Peer: 127.0.0.1

Exception on /edit [POST]
Traceback (most recent call last):
  File “/home/nrw/mblog/flask/local/lib/python2.7/site-packages/flask/app.py”, line 1687, in wsgi_app

[…]

IntegrityError: (IntegrityError) column nickname is not unique u’UPDATE user SET nickname=?, about_me=? WHERE user.id = ?’ (u’dup’, u”, 2)
———— END MESSAGE ————

This is pretty nifty! I’m doing the viewing emails in terminal thing. Sorry all you all pine users, but this is a novelty to me.

…okay I get bored and skip to the section I actually care about, the CSS section.

XII

http://blog.miguelgrinberg.com/post/the-flask-mega-tutorial-part-xii-facelift
Or more specifically, https://github.com/miguelgrinberg/microblog/commit/56d1d46326a79d9a3b9b6178ac02fe75c89625ad.
Really? That’s all there was to it? The transformation is really nice.

Customizing bootstrap

http://antjanus.com/blog/web-design-tips/user-interface-usability/customize-twitter-bootstrap-into-themes/

Final conclusion:

bleah all that, let’s just use the internet.
http://www.boottheme.com/#generatetheme

==============

 holy hexapods, ignore the following, 

=============

because I decided to startover. which involved doing the cd ~/dotfiles, ./install.sh restore, then also doing the ls -la and removing all the remaining symlinks, which looked like
sudo rm .weechat .Xdefaults .xmonad .screenrc .pythonrc.py .pdbrc .pdbrc.py .mutt  .msmtprc .inputrc  .hgrc .gimp .fonts .dir_colors


oh robutts what is my life. this is why I’m not course 6.

===

vim + python

I had an intermediate step where I realized I should probably fix up vi so, y’know, it actually behaves acceptably with python (like recognizing tabs and such).

http://sontek.net/blog/detail/turning-vim-into-a-modern-python-ide

*blinks* I’m still a bit confused, since I followed the instructions instead of just using the install script. Not actually being course 6, I’m not sure which parts of my ~/.vimrc folder I should put up on a git server (github). *shrug* I can always recreate it now. (I lost my dotfiles after google summer of code ’11 and missed them for a while). https://github.com/nouyang/dotfiles

Yuck. Ignore previous paragraph. I can’t get the leader key to work. (What is that leader thing? Turns out maps to by default.)  

 The symptoms look like this. also relevant, following this gal’s example I just reinstall everything.

So, I end up removing my entire .vim folder and reinstall with the sontek install script. Which requires I install ruby first… Whoops, it says rake: command not found.

later: on the leaderkey (set as a comma) not working

…for some reason,

nnoremap : ;

makes the leaderkey not work! wtf ?__? computers.

installing ruby on ubuntu

Conveniently enough, 6.170 sp13 is taught in ruby so I get this link off the slides.

 curl -Sso ./rails-installer.sh https://raw.github.com/rkjha/RailsOnUbuntu/master/rails-installer.sh

(I downloaded the non-raw file first by  accident). And following the rest of the instructions, 15 minutes later, after restarting gnome-terminal, I’m set.


rails new helloworld
cd helloworld
rails server

Then I visit http://127.0.0.1:3000/ and see a “welcome to ruby” page. yay.

Other notes / things I add…

Okay, excellent, now I have lots of things installed on my computer and insanely long dotfiles I don’t understand… Oh well. Some further notes and modifications:

(With following tutorials, as usual, I have to remember to

:set paste

Or else each line I paste in with ctrl-shift-v gets indented.
Apparently the reason is that the terminal can’t tell pasting from a lot of text being typed in at once.)

http://phuzz.org/vimrc.html

“Common command line typos
cmap W w
cmap Q q

http://stackoverflow.com/questions/164847/what-is-in-your-vimrc

” Swap ; and :  Convenient.
nnoremap ; :
nnoremap : ; “NOTE: Holy crap this breaks the key. take this line out.

” Spaces are better than a tab character
set expandtab
set smarttab

” Who wants an 8 character tab?  Not me!
set shiftwidth=4
set softtabstop=4

” This is totally awesome – remap jj to escape in insert mode.  You’ll never type jj anyway, so it’s great!
inoremap jj <Esc>
nnoremap JJJJ <Nop>

“{{{ Paste Toggle
let paste_mode = 0 ” 0 = normal, 1 = paste

func! Paste_on_off()
   if g:paste_mode == 0
      set paste
      let g:paste_mode = 1
   else
      set nopaste
      let g:paste_mode = 0
   endif
   returnii
endfunc
“}}}

” Paste Mode!  Dang!
nnoremap
<silent> <F12> :call Paste_on_off()
set pastetoggle=<F12>

NOTE: If you are in paste mode, the “jj ” mapping will not work. Also, if you set mouse mode on, you can’t copy-paste out of the terminal. And if you set line numbers on, when you copy-paste the line numbers get copy-pasted too. And on gnome-terminal (or ubuntu?) F10 seems to map to pulling down the toolbar options, so I used F12 instead. I also changed this tab-spaces = 4 instead of 3, because python.

Sontek mentions buffers versus tabs, and last time I only ever used tabs, so I read up on this here:
http://stackoverflow.com/questions/102384/using-vims-tabs-like-buffers/103590#103590

http://nvie.com/posts/how-i-boosted-my-vim/

 set hidden

Oh, and I turn off line numbers and displaying all the whitespace by commenting out the set list and the set number in ~/.vimrc.

other things to read:
http://stackoverflow.com/questions/1218390/what-is-your-most-productive-shortcut-with-vim

So now, some of the shortcuts I can use:
:e  to open a buffer, and ctrl-6 or :b1 to go to whichever buffer is open.
>> and << for indenting
to turn on/off paste mode
😡 to save and close (NOTE! I have, as mentioned, mapped ; to 🙂
:nmap to look at my shortcuts

resetting .bashrc for ubuntu, not mac

Meh, as usual with the internet, the .bashrc on sontek’s site is for mac osx and not ubuntu. I wanted to color my prompt, so I reverted to the default .bashrc
https://gist.github.com/marioBonales/1637696
Note that thanks to using the install script, I have a bunch of symlinks and the file I actually want to edit is ~/dotfiles/_bashrc …

and uncommented the “force_color_prompt = yes” line. Then I ran

source ~/.bashrc

to force reload the file and voila! color! yay. See https://help.ubuntu.com/community/CustomizingBashPrompt if you don’t know what I’m talking about, although note there are typos in that (e.g. they have color_prompt instead of force_color_prompt)

back to flask / jinja

lol. that took forever and a few inches of snow. It’s now… 1900. and snow’s supposed to get heavy around 9pm. Okay! Time to get going.

==
/note to self: productive = keep door open and headphones in. otherwise, i feel jittery with the door open for some reason, I close it, and then I fall asleep in an unmotivated heap. =__=;; derp hopefully this too will pass with time. also, being productive feels nice, no matter what particular item i choose to finish on #infiniteprojectlist.

Also, an interesting way to keep track of time passing (usually I use onlinevideoclock.com or tomatoi.st), set my netbook to go to sleep every 30 minutes and use it to play music while working on my desktop.